Faculty and Staff Online Resources
Preventing ZoomBombing
Zoombombing is a trend attacking virtual classrooms and meetings across the country. Zoombombing happens when uninvited guests crash Zoom meetings with loud and often inappropriate material. Many times they are doing it to fuel hate or possibly for attention on social media. Whatever their motive, it is disruptive and causes additional stress for the host and participants.
Some universities have experienced uninvited guests joining classrooms and yelling racial slurs or posting pornographic content.
To help you avoid this, we have compiled some tips and resources to assist you in keeping your meeting space safe.
Need help with a Zoom meeting?
Carroll Walker, IT Specialist, will be available with Virtual Office Hours at : zoom.us/j/920389983
He can also be reached by email at cgwalker@siu.edu or available in MS Teams.
Anytime you share your Zoom ID you are inviting anyone who sees it into your classroom. It is best to not share this ID publicly – this includes via any social media channel such as Facebook or Instagram. Only students registered for the class should be attending.
It is best to use a unique meeting ID for each separate classroom/meeting. While using your Personal Meeting ID is easier because it is the same each time, it can be easier for uninvited guests to join and be disruptive. Learn about how to setup a unique meeting ID versus using your Personal Meeting ID in this Zoom tutorial (at the :27 mark).
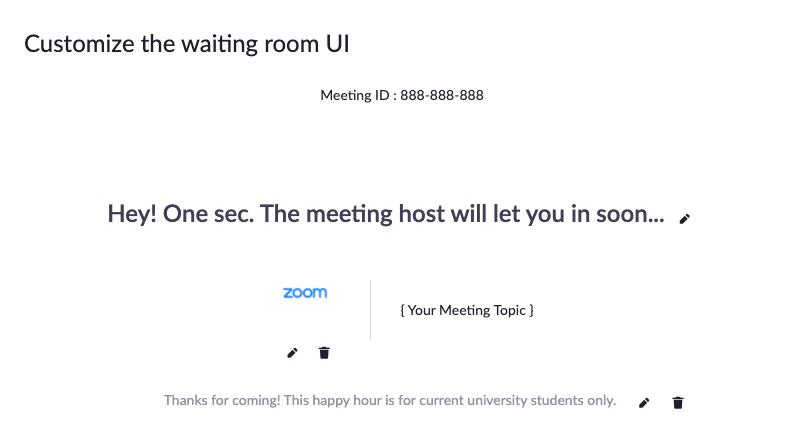
Using the Waiting Room might be the best option to control who gets into your meeting. As the name suggests it is a virtual waiting area that keeps your guests from getting in until you allow them.
Meeting hosts can customize Waiting Room settings for additional control, and you can even personalize the message people see when they hit the Waiting Room so they know they’re in the right spot. This message is really a great spot to post any rules/guidelines for your event, like who it’s intended for.
The Waiting Room is really a great way to screen who’s trying to enter your event and keep unwanted guests out.
Don’t give up control of your screen.
Don’t give up control of your screen.
You do not want random people in your public event taking control of the screen and sharing unwanted content with the group. You can restrict this — before the meeting and during the meeting in the host control bar — so that you’re the only one who can screen-share.
To prevent participants from screen sharing during a call, using the host controls at the bottom, click the arrow next to Share Screen and then Advanced Sharing Options.

Under “Who can share?” choose “Only Host” and close the window. You can also lock the Screen Share by default for all your meetings in your web settings.

Allow only signed-in users to join:If someone tries to join your event and isn’t logged into Zoom with the email they were invited through, they will receive this message:
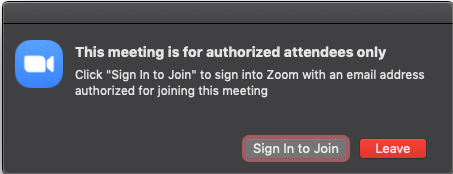
This is useful if you want to control your guest list and invite only those you want at your event — other students at your school or colleagues, for example.
- Lock the meeting : When you lock a Zoom Meeting after it has started, no new participants can join, even if they have the meeting ID and password (if you have required one). In the meeting, click Participants at the bottom of your Zoom window. In the Participants pop-up, click the button that says Lock Meeting.
- Set up your own two-factor authentication: You don’t have to share the actual meeting link. Generate a random Meeting ID when scheduling your event and require a password to join. Then you can share that Meeting ID through a public setting/social media and only send the password to join by email or direct message.
- Remove unwanted or disruptive participants: From that Participants menu, you can hover over a participant’s name, and several options will appear, including Remove.
- Allow removed participants to rejoin: When you do remove someone, they can’t rejoin the meeting. But you can toggle your settings to allow removed participants to rejoin, in case you remove the wrong person.
- Put them on hold: You can put each participant on a temporary hold, including the attendees’ video and audio connections. Click on someone’s video thumbnail and select Start Attendee On Hold to activate this feature. Click Take Off Hold in the Participants list if/when you’re ready to have them back.
- Disable video: Hosts can turn someone’s video off. This will allow hosts to block unwanted, distracting, or inappropriate gestures on video.
- Mute participants: Hosts can mute/unmute individual participants or all of them at once. Hosts can block unwanted, distracting, or inappropriate noise from other participants. You can also enable Mute Upon Entry in your settings to keep the noise down in large meetings.
- Turn off file transfer: In-meeting file transfer allows people to share files through the in-meeting chat. Turn this off to keep the chat from getting unwanted content.
- Turn off annotation: You and your attendees can doodle and mark up content together using annotations during screen share. You can disable the annotation feature in your Zoom settings to prevent people from using it.
- Disable private chat: Zoom has in-meeting chat for everyone or participants can message each other privately. Restrict participants’ ability to chat with each another during your meeting. This prevents anyone from getting messages during the meeting.